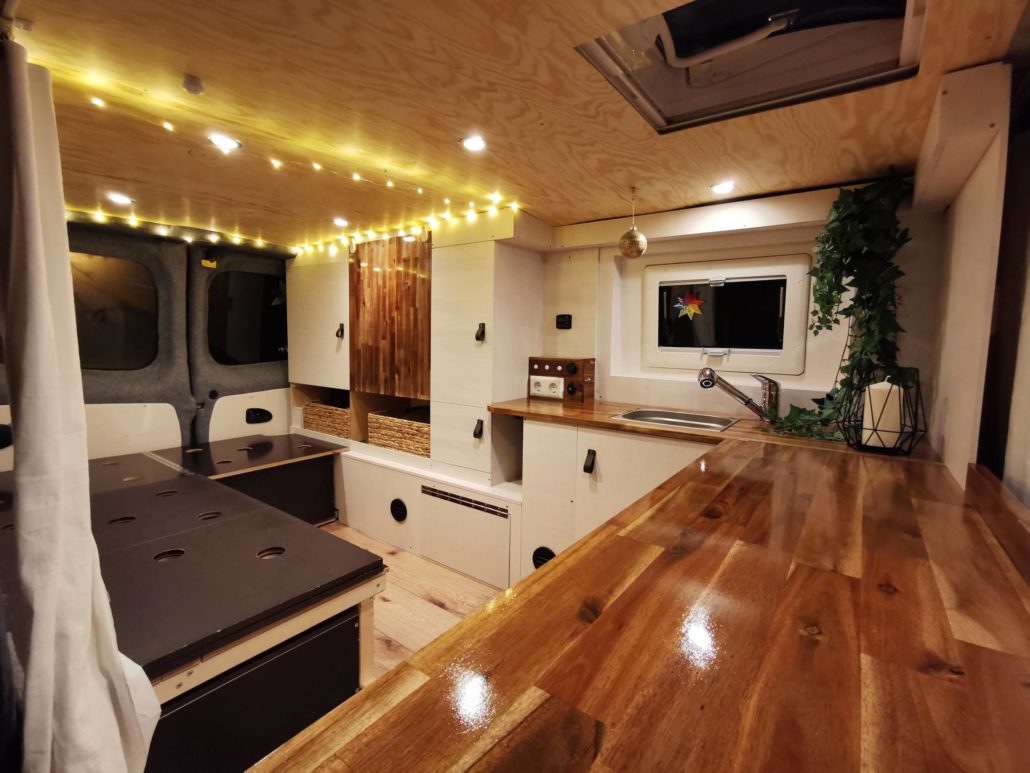
Campervan Hugo tells his story: Hi! I’m Hugo – at least that’s what my new owners (Johannes and Birgit) named me in the fall of 2020. I recently turned 6 years old and am an L2H1 Renault Trafic in a vibrant, life-affirming green color. I’m here to tell you all about my camper van conversion story!

I met my new family in Berlin. The young couple came all the way from Munich to check me out and see if they wanted to adopt me. Well, lucky for me, they signed the contract on the same day! Adoption costs: 9999€ – and I am worth every cent!

Barely a month later (both of them quit their jobs to take care of me full time) we drove to Karlsruhe, where Birgit’s mother and grandma live. It was very nice to meet her relatives and get to know my new extended family.

In the three months that followed, Johannes and Birgit took great care of me and took on a full-time project of van conversion to campervan. Like most people who take on a DIY project, I’m pretty sure they thought everything would be easier than it was.

But for anyone else out there who is thinking of a camper van conversion, read on to learn about their process. Maybe you’ll get some inspiration from my makeover story!

Essential Amenities for my Camper Van Conversion

Allow me to walk you through a few changes that happened during the story of my Renault Trafic camper conversion.

1. Insulation Against Heat and Cold

I was insulated with 19mm, 9mm, and 3mm Armaflex as well as sheep’s wool. After lots of research, Birgit and Johannes found out that wool is one of the best options for insulation: it insulates well against heat and cold, does not mold, and is eco-friendly (after all, it grows on sheep!).  So now, I can protect my family from heat and cold.
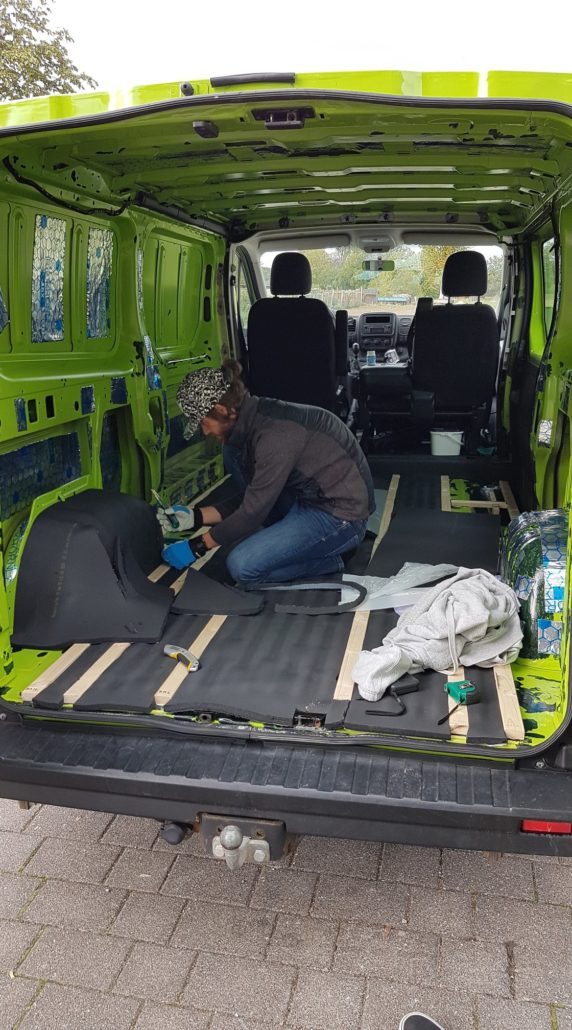
Johannes hard at work on the insulation

Johannes hard at work on the insulation

2. Click Vinyl Flooring

To create a liveable interior, Johannes and Birgit set about installing chic flooring. Unfortunately, the click vinyl flooring was much trickier than anticipated. Even I know that you should watch a video of how to lay vinyl flooring BEFORE trying to do it!
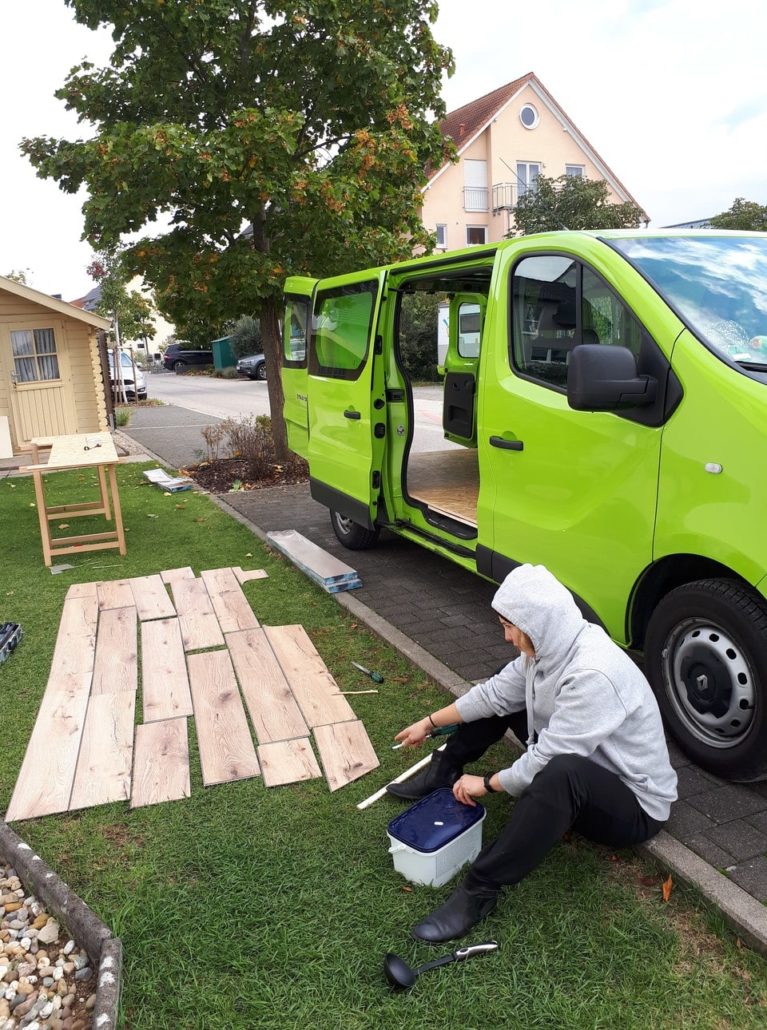
Birgit's mission: Move the flooring from the green grass to the green camper.
Birgit’s mission: Move the flooring from the green grass to the green camper.


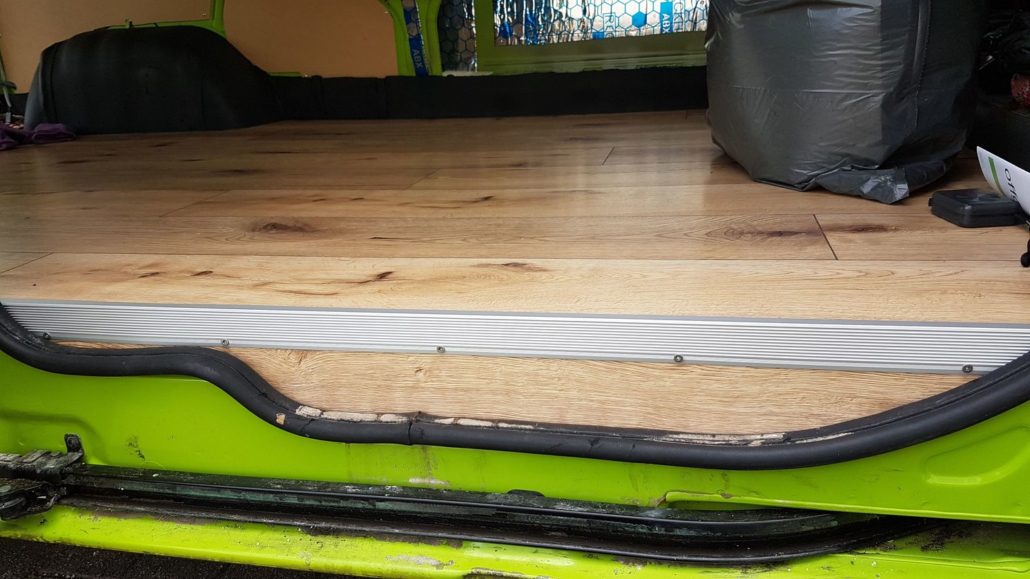
Success! Finishing the edge of the vinyl flooring

Success! Finishing the edge of the vinyl flooring

3. A New Side Window and Skylight

In contrast with the difficult flooring installation, it was a snap to cut two new openings for my roof window and side window. That was done in just one day. I’m glad they chose high-quality Dometic windows. They even come with built-in screens and blackout blinds!
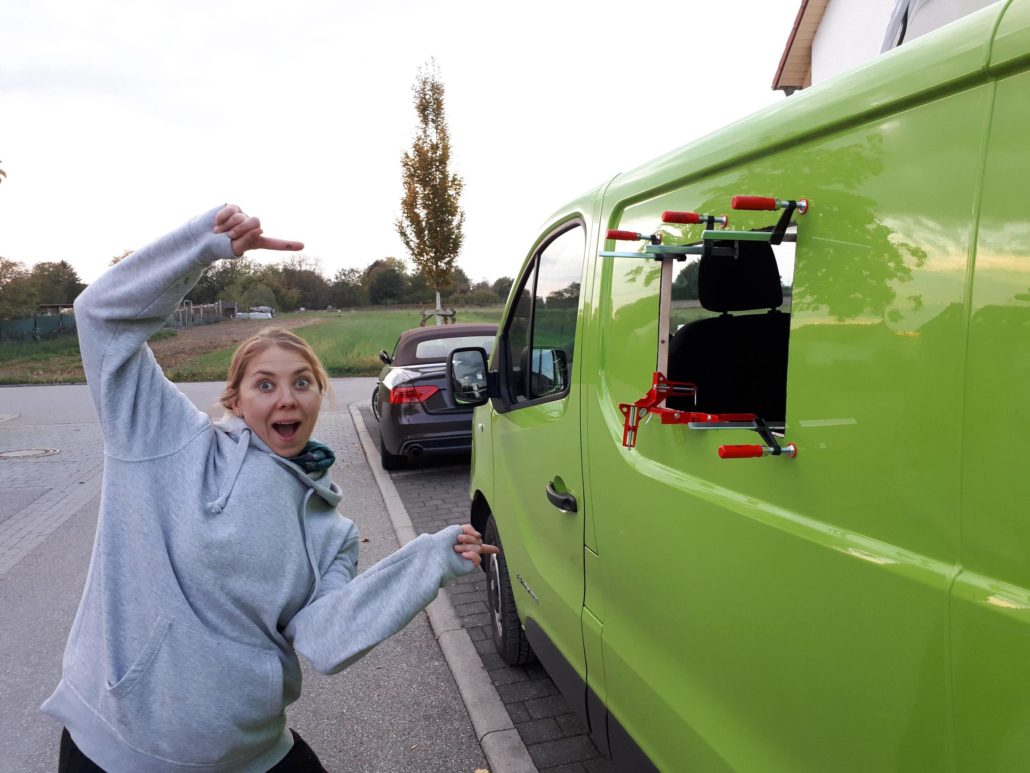
Once I got my new side window I really started to feel like a camper van!

Once I got my new side window, I really started to feel like a camper van!

4. Tigerexped Parking Heater for Winter Trips

The two decided early on that they would want to travel with me in the winter since I am perfect for a cozy retreat. For cold-weather trips, I got a parking heater from Tigerexped, which has 2 kilowatts of power.

I’m now able to heat the interior from 0 to 20°C (freezing to a comfortable room temperature) in just 10 minutes! They did all the installation themselves, aside from the gas tank tap, which was done by a pair of helpful hands from a local auto repair shop. I very much appreciate it, since the tank is one of my most sensitive components!
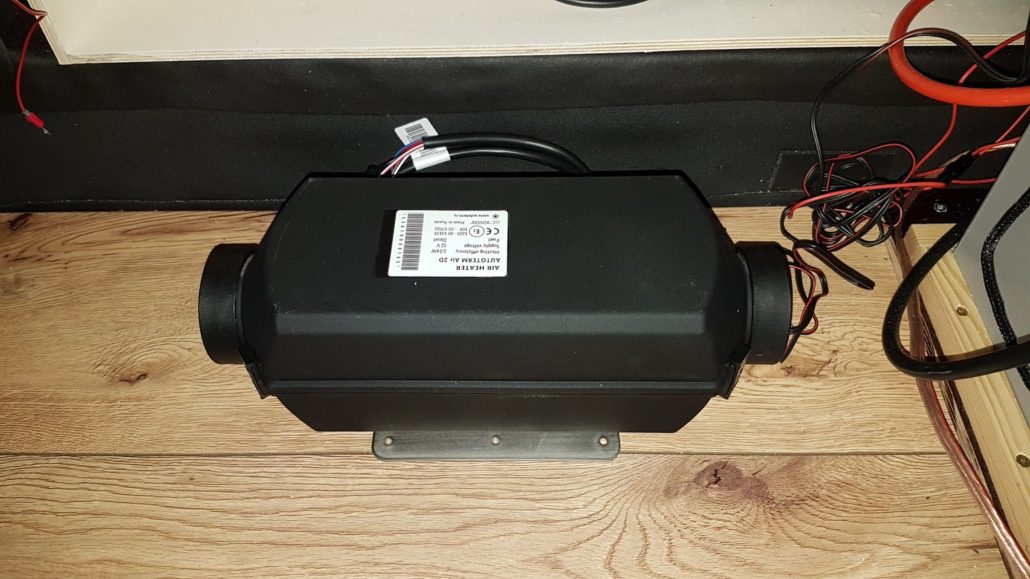
Autoterm Air 2D heater from Tigerexped

Autoterm Air 2D heater from Tigerexped

5. Stylish Side and Roof Panels for a Livable Interior

My side panels are made of multiplex panels that were sanded and painted white, plus 4-way stretch felt. Felting was fun for Jo & Bibs, I could tell they enjoyed it!

Luckily, felt is a forgiving material, so they didn’t have to be quite as precise as they had to be for other aspects of my van makeover. They simply applied adhesive spray to the Armaflex and pressed the felt on bit by bit.

Their oft-praised “secret weapon” was an orange peeler from Birgit’s mother’s kitchen. With it, they could stuff the felt into even the tightest cracks, and now I look nice and neat! 😉
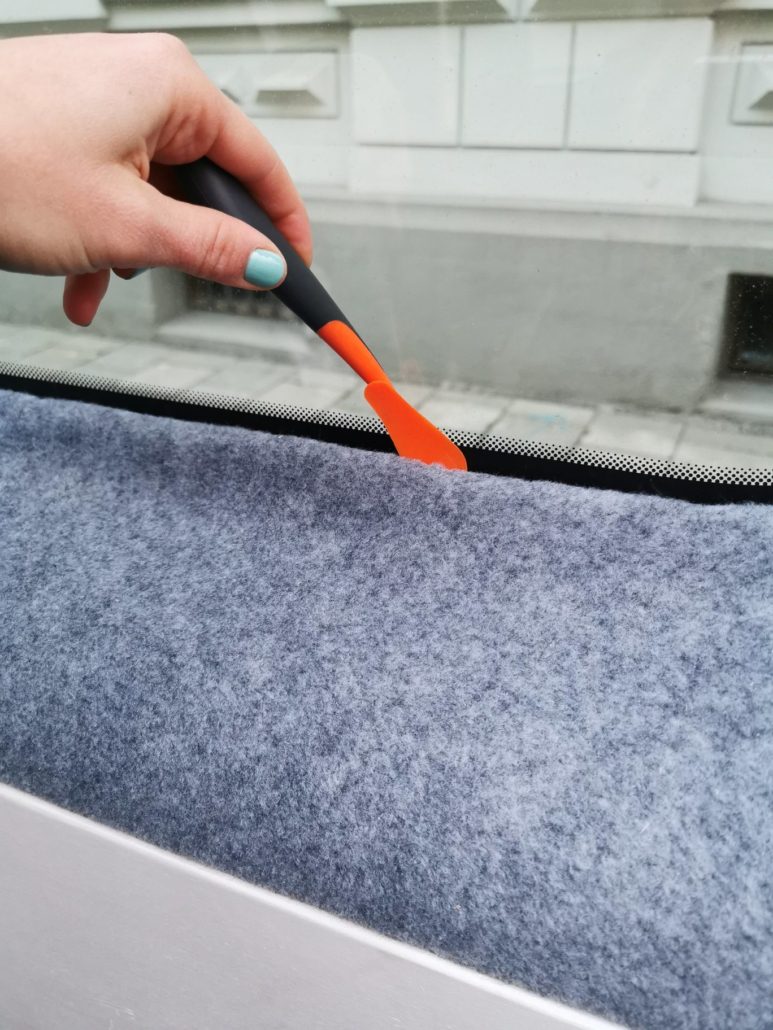
The secret weapon: an orange peeler to help achieve a clean finish on the felt.

The secret weapon: an orange peeler to help achieve a clean finish on the felt.

My ceiling is made of 4mm-thick birch wood. Before installing, it was soaked with oil to prevent mold and keep it in good shape over the next several years.

It was the right plan in theory, however, they realized after the fact that they should have used a different type of oil. Unfortunately, my interior still has a distinct smell from the oil (even tho it is intended for living rooms!). I’m still getting used to it, but they would probably recommend a different one.

The smell is slowly fading away, and to accelerate the vaporization of the oil, they leave my closet doors open with the windows cracked whenever I’m parked.
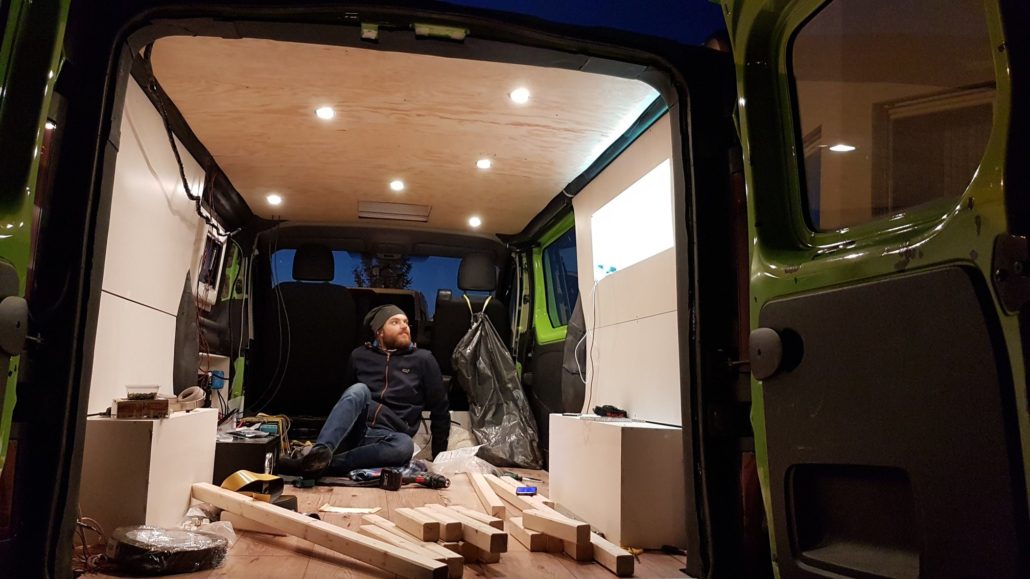
Johannes admires my interior. My conversion from van to camper van is coming along!

Johannes admires my interior. My conversion from van to camper van is coming along!

6. Self-Sufficient Power for Camper Van Living

One of my coolest features is the 6 LEDs embedded in my ceiling- The front 3 can be switched on and off independently from the rear 3, and even from 2 different locations.

Alternate switching is the keyword here! All in all, they took great care of my electrical system. Especially Jo was very interested in this part of my camper van conversion, calculating all the cable strengths and figuring out the necessary fuses that I would need. 

Within my cozy cabin, I have a 180Ah AGM battery, a 300-Watt inverter for laptops, a 32-Liter cooler from Mobicool, a submersible pump, various USB chargers, and even a monitor so that Johannes and Birgit can hop in and travel with me while they work remotely.
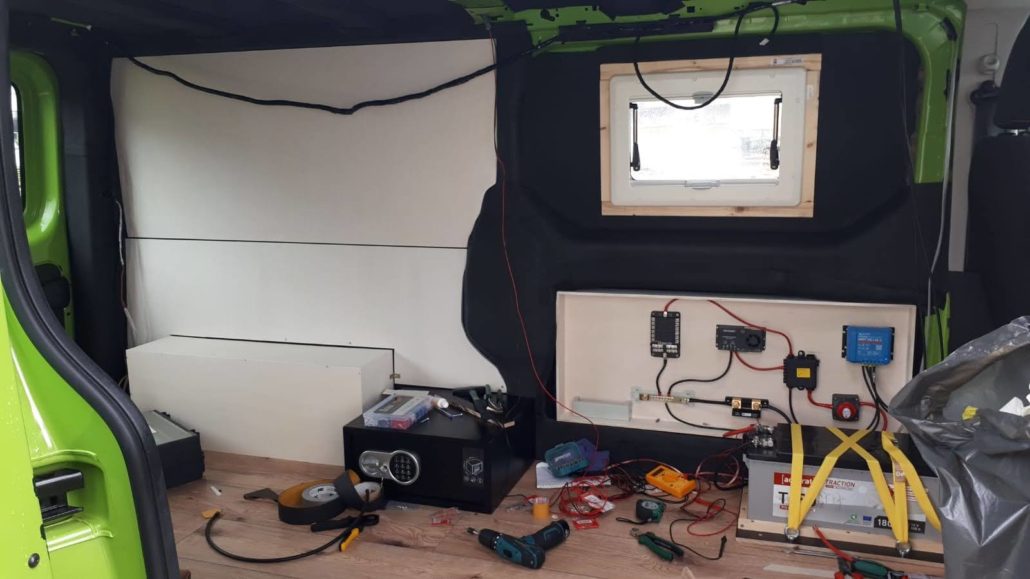
The electrical heart of Hugo

The electrical heart of Hugo

And guess what – all of these devices are powered by the sun! My owners installed a 360-Watt solar panel on my roof. It’s a standard solar panel like the ones you see on house rooftops.

Johannes and I picked it up from a solar builder in the neighboring village. My owners first used industrial glue to attach 4 spoilers to my roof and then screwed the solar panel onto them.

The wires run into my interior and connect to the battery. I think it’s great that during my camper van conversion they figured out how to use the sun to generate green energy – after all, green is my favorite color!
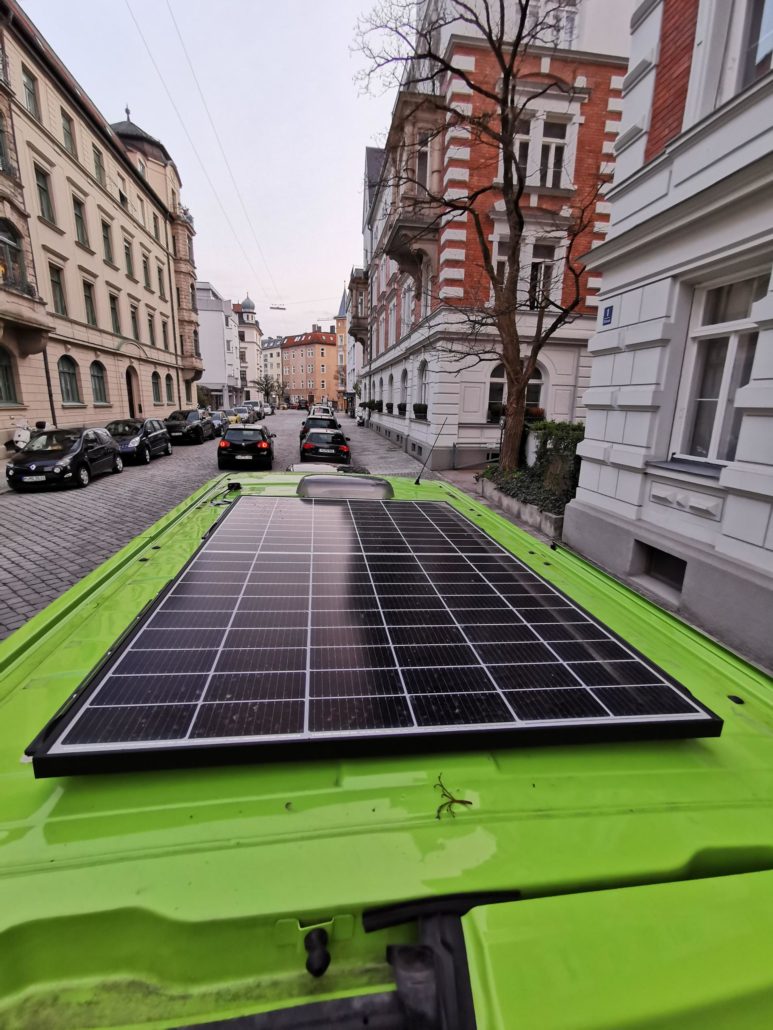
360 W solar system on Hugo's roof

360 W solar system on Hugo’s roof

Update: Unfortunately the glue didn’t stick to the solar panel spoilers. Luckily Johannes and Birgit noticed before it was too late and dismantled the solar panel during their recent vacation in Italy.

So for now I don’t have a solar panel on my roof but Johannes and Birgit are working on a solution. Van conversion is a constant process!

In the meantime, I’m using a charge booster to charge the battery while driving. This can be switched on/off by a special switch in the driver’s compartment. Now that my interior battery cannot be loaded by the sun anymore, I’m very glad that this charge booster was installed.

Space-Saving Design Features

My interior living space is really cool and I have to say, very well thought out! It has to be, because as is the case with all camper van conversion projects, the space is limited: As a typical Renault Trafic before my camper conversion, I had about 5m² (54 square feet) of space in the living room – and a height of just 140 cm (55 inches). So it’s important to make the most out of every spare millimeter. 

Like most camper van conversion projects, I am full of hidden features and tons of practical space-saving tricks! Let me take you on a little tour of all the cool things inside 😉:

  • Funky LED sideboard with a corkboard and integrated USB charging station.
  • White cabinet wall with tons of storage space, the cabinet door is also the table. It’s made of beautiful acacia wood – for a camper van like me, fine wood is basically like fine jewelry. The external monitor is tucked behind the cabinet.
  • A camping stove that can be pulled out through a drawer, making it easy to cook outside if weather permits! Underneath that drawer is another drawer. Drawer-inception, so to speak. It serves as an additional area to cut vegetables when cooking.
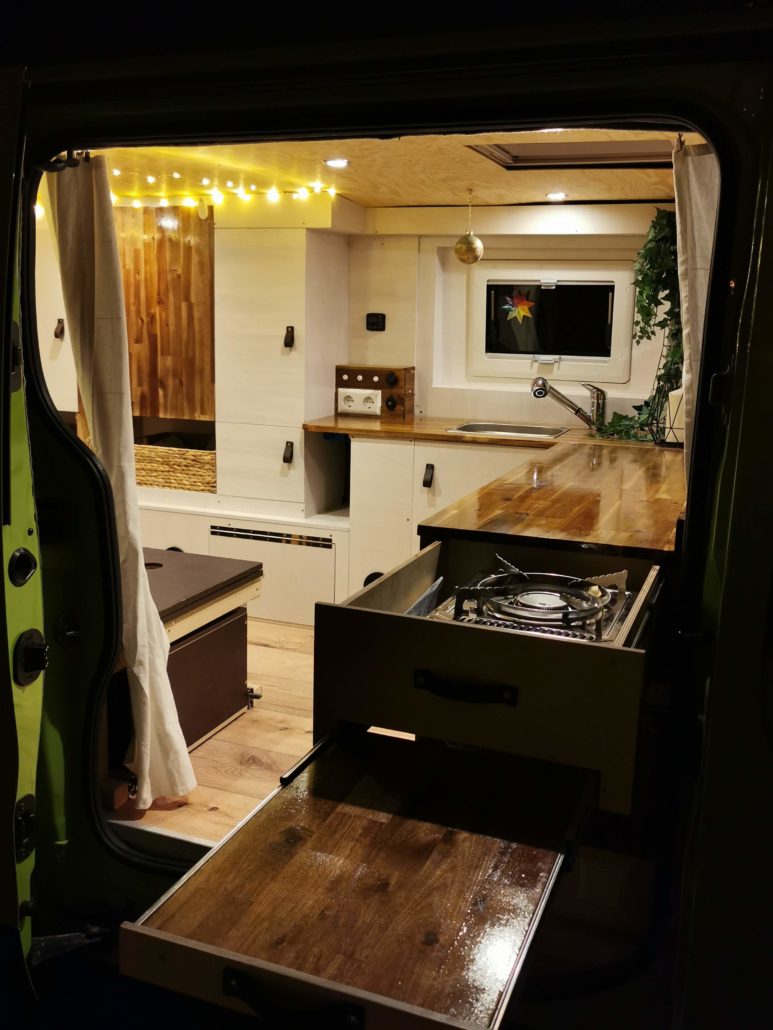
Kitchen set up in a van conversion project

Drawer inception for expandable space in the kitchen

  • The entire space under the bed can be used for storage. There are 3 heavy-duty drawers + an area with space for either a folding box or a crate of beer. I’d love to say this was planned – but the fact that my humans chose these exact dimensions was pure coincidence.
  • I even have a small sink. The water comes from a 12-liter fresh water tank under the sink, flows through the kitchen faucet, and drains into the 12-liter waste water tank. By the way, the faucet can be pulled outside through the side window and used as an outdoor shower. Ideal after a strenuous hike!
  • The bed is flexible and adjustable, so it can either be used as a bench or a large bed measuring 200cmx125cm (about the size of a Full bed). If you want to sit at the table, the bed can be made into a U-shape and three people can sit.
  • The acacia cabinet door has two drive-in nuts, which allow you to screw in two large threaded bolts with feet to become the table legs. When it’s folded down, the table legs rest on a part of the bed, so it’s super stable.

The Final Touches for my Renault Campervan Conversion

My cozy interior really came together with the addition of the light gray “home-sewn” mattress (well… sewn by Birgit’s aunt – that was a 14-hour sewing marathon!).

The white curtains provide privacy and complement the white furniture and the dark brown acacia wood in the kitchen. Artificial ivy hides the electrical cables and creates a homey atmosphere.

With the ceiling lights on and a candle lit, I transform into quite a romantic little place! Seeing me now, you would hardly believe that I was once an empty Renault Trafic before my camper conversion makeover.

Bed arrangement in a camper van conversion project

DIY Van conversion project

Makeover complete! Can you believe how far I’ve come?

What’s Next for Campervan Hugo?

Originally, my new owners budgeted 2 months to convert me from van to campervan. That they overestimated themselves was clear to me from the beginning – but sometimes people have to learn the hard way!

I will probably never become a real full-time camper for the so-called ‘van life’. Even though Johannes and Birgit are very fond of each other, <5m² is a bit small for the long term.

In any case, the two had a great vacation with me this summer. We drove through Germany, Switzerland, and Italy together.

I’m not sure what our plans are for next year, but we will definitely go to the mountains for hiking or maybe a snowy getaway. If you’re interested in what the future brings for me, you can follow along at @hugo_campervan on Instagram. Maybe you’ll get inspiration for your own Renault Trafic camper conversion.

In closing, I just recently overheard a conversation that made me so happy, and I would like to share it with you. Maybe you as (future) van builders or owners see it exactly the same way:

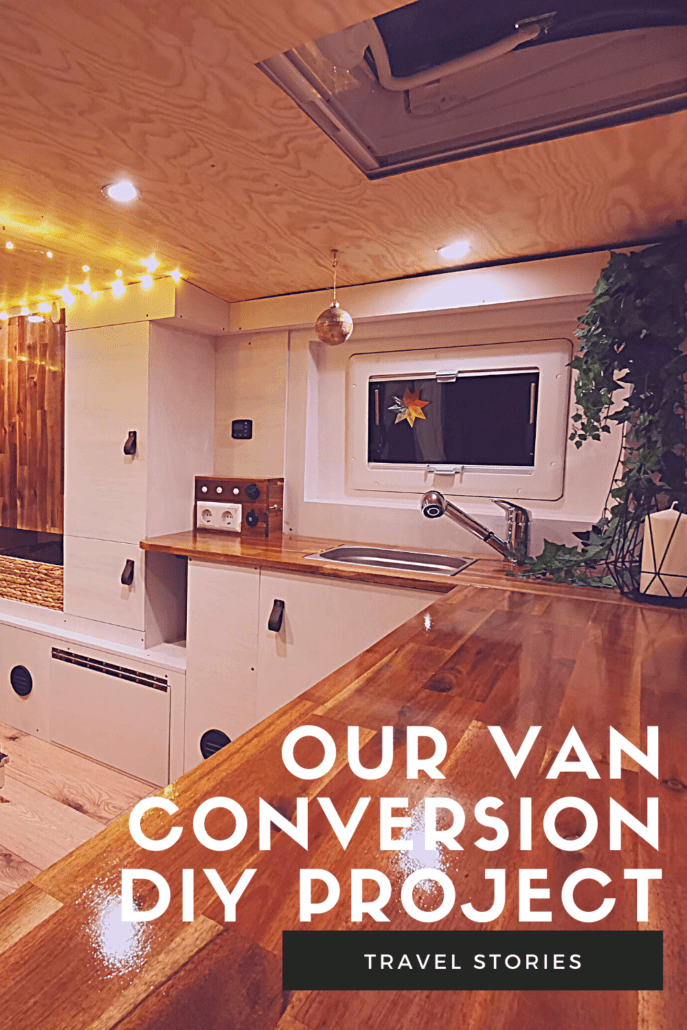
“Hugo is our little second home and the whole world is our backyard!”

DIY Van Conversion

Features of the Top Knowledge Management Software Solutions for Enterprises

Knowledge management software is essential for enterprises aiming to streamline operations and foster team collaboration. These solutions enable businesses to efficiently organize, share, and manage critical information. As the demand for advanced enterprise solutions grows, many software options emerge with distinct features to meet these needs. Below, we will explore key features that distinguish top knowledge management software from the rest. Keep reading to understand how these tools stand out in the competitive landscape.

Key Functionalities of Enterprise Knowledge Management Software

img

Alt text: Employees utilizing top knowledge management software to centralize and organize company information for improved collaboration and efficiency

Enterprise knowledge management software is designed to centralize company information, ensuring employees can access critical data easily. A primary feature is the content repository, which allows users to store documents, files, and other resources in an organized manner. This feature ensures that important knowledge is not lost and can be retrieved quickly when needed.

Search functionality is another essential aspect of knowledge management tools. A powerful search engine lets users quickly locate the information they need within a vast database. The ability to filter search results further enhances this, allowing users to refine their queries and find the most relevant content without sifting through irrelevant data.

Collaboration tools are integral to the effectiveness of these platforms. Features like discussion forums, shared workspaces, and real-time editing foster communication among team members. This level of collaboration ensures that knowledge is continually updated and refined, enabling employees to contribute their insights to collective intelligence.

Security and access control features are critical in enterprise environments. Knowledge management systems allow administrators to define user roles, ensuring only authorized individuals can access certain content. This protects sensitive information while allowing for seamless sharing within the appropriate circles.

How the Best Knowledge Management Tools Improve Organizational Efficiency

img

Alt text: Employees collaborating with top knowledge management tools to enhance organizational efficiency

The best knowledge management tools significantly reduce the time spent searching for information. By centralizing data in one platform, employees no longer need to waste time locating documents across various locations. This streamlined approach allows teams to focus on more critical tasks, improving overall productivity.

These tools enhance decision-making by providing easy access to historical and up-to-date information. With all the data stored in one location, decision-makers can base their choices on the most relevant and recent insights. This leads to more informed and effective business strategies that drive success.

Knowledge management software eliminates duplication of efforts by ensuring that everyone has access to the same resources. When teams can easily access existing knowledge, they avoid reinventing the wheel. This saves time and ensures consistency in how tasks are approached, and problems are solved across the organization.

Moreover, these tools encourage continuous learning and development within teams. Knowledge management software often includes features like training modules and learning resources. These tools empower employees to acquire new skills and stay updated with industry trends, fostering an environment of growth and innovation.

Comparing the Leading Knowledge Management Software Solutions for Enterprises

When comparing top knowledge management software, it’s essential to assess user-friendliness. Some platforms prioritize intuitive interfaces, ensuring that employees can start using the software with minimal training. These solutions make it easier for businesses to onboard staff and quickly integrate them into the knowledge-sharing ecosystem.

Scalability is another crucial consideration for enterprises looking to adopt knowledge management software. Leading tools are designed to grow with an organization, allowing businesses to add users, departments, or entire branches without losing efficiency. This adaptability makes these platforms suitable for small and large multinational corporations.

Integration capabilities play a significant role in determining the effectiveness of a knowledge management system. The best software solutions seamlessly integrate with existing enterprise tools, such as customer relationship management (CRM) systems, enterprise resource planning (ERP) software, and communication tools. This ensures that all data flows cohesively within the business ecosystem.

Support and training resources are also vital when choosing a knowledge management software solution. Leading platforms offer comprehensive support through tutorials, customer service, and regular updates. These resources ensure enterprises can maximize the software’s potential and troubleshoot any issues arising over time.

Altogether, the top knowledge management software solutions are pivotal in improving organizational efficiency, fostering collaboration, and optimizing knowledge-sharing across teams. By selecting the right platform, enterprises can streamline processes, enhance productivity, ensure consistent decision-making, and drive long-term success in a competitive business landscape.

What’s the first thing that comes to mind when you think about Britain? The iconic culture of the nation is woven from a deep sense of tradition and an unwavering pride in its everyday quirks.

From hearty meals that unite families to the simple pleasure of a well-brewed cup of tea, British culture offers special experiences. Let’s take a closer look at five things that British people hold dear, providing insight into the heartbeat of the country.

A proper cup of tea

No discussion is complete without mentioning tea. Over 100 million cups of tea are consumed daily in Britain, reflecting its status as a national treasure.

Whether it’s a builder’s brew or a posh afternoon tea, the ritual of tea drinking is embedded in everyday life. A survey found that 91% of British adults drink tea regularly, with many consuming five or more cups a day.

The love for the beverage goes beyond refreshment. It’s a social staple, a moment of calm, and a way to bond with others​.

The Great British countryside

The countryside is a source of national pride. With areas like the Lake District, the Cotswolds, and the rolling hills of Yorkshire, the countryside offers serene escapes from city life.

It’s not uncommon for people to spend weekends hiking, visiting charming villages, or simply enjoying the lush, green landscapes.

National Trust properties and countless walking trails encourage Brits to connect with their natural heritage, making countryside escapes a cherished part of British life.

The Sunday Roast

Nothing says comfort food like a Sunday roast. This traditional meal includes roasted meat, potatoes, vegetables, and Yorkshire pudding, all drenched in gravy.

Over 80% of British households enjoy a hearty roast weekly​. It offers a time for family and friends to gather, making it a beloved tradition that spans generations.

Bingo and game shows

Bingo has long been a favourite pastime in the UK, with its roots stretching back to the mid-20th century. While traditional bingo halls are still popular, modern platforms have introduced variations like Deal or No Deal Bingo, which blends the excitement of the TV game show with the classic bingo format.

Brits love a game show. From classics like The Generation Game to newer shows like The Chase, British game shows are a source of entertainment and a cultural phenomenon that brings people together.

Love for the weather (or talking about it)

Brits are famously obsessed with the weather, but it’s less about the climate itself and more about the conversation. Whether it’s sunny, rainy, or something in between, discussing the weather is a go-to topic for small talk.

This habit is deeply ingrained, as it provides a safe, neutral conversation starter that cuts across social barriers. The unpredictability of British weather – where you can experience sunshine, rain, and wind all within an hour – ensures there’s always something to discuss.

If you’re a frequent traveler and love to write and take photos, maybe you’ve considered creating your travel website. And if you haven’t considered it yet, perhaps you should.

Creating a travel website is a great way to exercise your writing muscles while recording and logging your travels more interestingly outside of just photos.

If we’ve piqued your interest and you’re now interested in launching your travel website, read on, as this article will help you start your website soon.

Choose a memorable travel blog website name

When creating your travel website, one of the first things you should do is develop a memorable travel blog website name.

Ideally, you want something somewhere between memorable and not too generic. You like it in this world of a name that no one could remember, but you don’t want it to be so common that it’s also forgettable.

Also, it’s a good idea to be as concise as possible with the name so that it’s more memorable. If the name means something to you, you’ll have a stronger attachment, which is always great.

If possible, if you’re making a niche travel website, it should be palpable with your travel blog website’s name. For example, if you’re a frequent adventurer in the Asian continent, make that clear in your name.

Another thing to note is that, ideally, your blog’s website name is the same as its domain name. That way, if someone remembers your travel blog’s name, they can type that in, add a .com, and find your website immediately. We’ll talk more about domain names later.

Choose a hosting and platform

Now that you have a blog name that you want, it’s time to start the foundations of your website, which would be a web host and platform.

When it comes to choosing your travel website’s hosting platform, there are a few things that you should consider.

First, look into their content management system (CMS) installation. For many websites, WordPress is the best choice for this. It’s one of the most straightforward ways to upload blog posts on your website.

It would help if you also were mindful of their content delivery network (CDN) since the CDN affects how fast your content loads for your users. It makes using servers near your website visitors to present said content faster.

Another factor to consider is the servers’ bandwidth to ensure the data transfer is as fast as possible.

You might also be mindful of the pricing since that’s a commitment. If you want more bandwidth with your hosting server, then you should avoid those shared servers, but sometimes, if that’s all you can afford, that’s okay. Just look for scalability instead so that when the time comes when you want to get more bandwidth, you don’t have to obtain a new hosting provider.

Get your domain name

As mentioned earlier, your blog name should ideally be the same as your domain name. If you don’t know what it is, the domain name is like your website’s address on the Internet. It comprises both the domain name and the extension.

The domain name is the website name that you usually type in the URL section of a web browser. On the other hand, the domain extension is tagged at the end of the domain name and indicates the purpose of a website. Some examples of the most popular domain extensions are .com, .net, .edu, .gov, etc.

Your blog name should be as close as possible to your domain name. It can be confusing for a web visitor to navigate to a website with a title different from its domain name.

Aside from that, consistency is vital for branding reasons. If your website name is memorable, that’s most likely the domain name people would type in on the URL to look for your site. If you don’t have a domain name that’s the same as your blog name, you might be losing out on traffic to your site.

Select a suitable theme for your website

Now that you have the skeleton of your website, it’s time to start working on the front-facing aspects of your travel website, beginning with your website theme.

Luckily, there are tons of free website themes out there. If your website uses WordPress, there are tons of web designers who create both free and paid themes. You can use thousands of these themes and modify them a little.

Now, if you want more freedom with the look of your site, the preset themes won’t be enough. According to Sytian Productions web developer Philippines, you can hire a web developer if you want a more curated and unique website theme that isn’t just from the presets.

Design your travel blog

Once you have an overarching theme, you can dive deeper into the web design of your travel blog.

You can start picking your preferred brand colors. It would help if you also dictated whether you want a minimalistic website look or something else altogether.

Since you are a travel website, the heart of your website will most likely be the blog posts you’re writing. Therefore, if there is any design aspect of your website that you should pay attention to, it should be the formatting of your blog posts.

Not only should you want your content to be easy to read, but you should also make it easier for your web visitors to look at the photos you may attach to your blog content.

Start creating your content

Since we’re already talking about content, now that you have a working website, it is time to start creating content.

You might still need to launch your website, but you can schedule posts in advance. Your blog content isn’t the only important content on your website; your main pages should already have content.

Your main page should indicate clearly what your travel website is about and then showcase your blog posts or travels. You should also have a contact page with the correct details. If you have other vital pages on your website, then now is the time to fill those pages with the best content.

Launch your website

Now that you’ve got everything up and running, it’s time to let everyone see all that hard work. It’s time to launch your site!

It would be best to look at your website from different devices to ensure that it functions as it should, no matter what device a website visitor views it from. Don’t forget to promote your website on social media if you have any.

Optimize your website for search engines

It would be best to consider SEO strategies as you continue to create content for your website.

SEO stands for search engine optimization. That means you should target the right keywords within your content. That way, it can attract the right people to your website.

Conclusion

With these tips, you should now be a proud travel website owner. It’s time to start traveling more, logging these travels, and publishing about your adventures on said blog post. Bon voyage!

Embarking on a winter backpacking or hiking adventure presents unique challenges and rewards. The crisp, cold air and the serene beauty of snow-covered landscapes offer an unparalleled experience for outdoor enthusiasts. Yet, the harsh winter conditions demand more than just mental preparation and physical endurance; they require specialized gear tailored to withstand the cold. For hikers and backpackers, every item in their pack must earn its place by being functional, durable, and versatile.

The importance of proper attire cannot be overstated in these conditions. Layering is a well-known strategy in the outdoor community, providing the flexibility to adjust to changing temperatures and activity levels. However, navigating the challenges of winter weather adds a complex layer to outdoor preparation. The focus shifts beyond simply keeping warm. It becomes a delicate balance of controlling body heat, effectively handling sweat and moisture, ensuring sustained comfort during extended periods, and concurrently considering the weight and volume of your equipment. These factors are crucial for a successful and enjoyable winter adventure.

For those who wander in the wilderness, the Weston Heated Fleece Jacket steps in as a solution, promising to keep you snug without sacrificing your freedom of movement or sense of style. It’s designed for the rugged demands of outdoor life, making it an ideal companion for everything from leisurely nature walks to strenuous mountain climbs.

Heated Jacket for winter hiking

Try the Weston Heated Fleece Jacket to stay warm during winter hiking

The Weston Heated Fleece Jacket presents a fusion of cozy fleece and premium heating technology. In this review, we delve into its features, similarities across genders, and differences in design and weigh the pros and cons. We also share tips for optimal use, helping you decide whether the Weston Heated Fleece Jacket is a product that fits your bill.

To start off, it is important to mention that the Weston Heated Fleece Jacket is a versatile and innovative winter apparel designed to provide warmth and style, offering a cozy and comfortable experience in cold weather. The jacket is available for both men and women in various sizes. 

Similarities Between the Weston Men’s and Women’s Heated Fleece Jacket

Are you looking for a shared core of warmth? The Weston Heated Fleece Jacket may be the solution to your needs. The heated fleece jacket transcends gender boundaries with a shared foundation of features as outlined below: 

  • Premium Heated Technology: The jacket incorporates three heat settings (High-130℉, Medium-120℉, and Low-110℉), delivering customizable warmth. This ensures that whether you’re facing a mild chill or a freezing cold day, the Weston Heated Fleece Jacket keeps you warm all through.
  • Ultra-Soft Fleece Material: Crafted from ultra-soft and breathable fleece material, the jacket guarantees all-day comfort. This material not only keeps you warm but also ensures a pleasant wear experience, making it suitable for various outdoor activities like hiking, skiing, snowboarding, and everyday use.
  • Rechargeable Battery: Equipped with a Certified Rechargeable 5V battery, the jacket’s heating system can last 8+ hours on a single charge. This eliminates the hassle of constantly replacing disposable batteries, adding to the convenience and eco-friendliness of the jacket.

Differences Between the Weston Men’s and Women’s Heated Fleece Jacket

While maintaining a shared core, the Weston Heated Fleece Jacket for men and women has its differences, with the main one being the discounted price:  

  • Current Prices: Weston Heated Fleece Jackets for men are slightly pricey compared to the women’s jackets. For instance, the men’s Heated Fleece Jacket currently costs $169.95 while the women’s version is currently available for $149.95. 

Please note that the current prices for both the men’s and women’s heated fleece jackets are 43% and 50% off, respectively, the usual price of $229.00.

Advantages of the Weston Heated Fleece Jacket

  • Exceptional Warmth: The heating system provides outstanding warmth, making the jacket perfect for outdoor activities and chilly environments.
  • Comfortable Fleece Material: The soft and breathable fleece guarantees comfort throughout the day, ensuring a pleasant wearing experience.
  • Rechargeable Battery: The long-lasting battery removes the need for disposable batteries, contributing to the jacket’s overall convenience.
  • Washable Design: The machine-washable feature simplifies maintenance, allowing users to keep the jacket clean and fresh effortlessly.

Moreover, the varying user experience is worth bringing to attention. Many users praise the jacket’s style, softness, warmth, comfort, and extended battery. 

Customer review of the Weston Heated Jacket

Weston Heated Fleece Jacket Features: A Detailed Rundown

The Weston Heated Fleece Jacket comprises various features that make it stand out from other jackets as highlighted in the following culled list: 

  1. Heating Levels: The jacket offers three heat settings (High, Medium, and Low), allowing users to tailor their warmth level based on individual preferences and weather conditions.
  2. Temperatures: Capable of withstanding temperatures as low as -25°F (-31.67°C), the jacket ensures a reliable source of warmth in even the coldest environments. It can be used as a standalone jacket in mild weather or as a mid-layer on chilly days.
  3. Rechargeable Battery: The included rechargeable 5V battery provides up to 8 hours of warmth on a single charge, enhancing the jacket’s usability.
  4. Colors Available: The jacket caters to individual style preferences and is available in various colors, including black and gray. So, if you are an avid lover of black apparel, you can get the black Heated Fleece Jacket, same if you love gray.
  5. Size Chart: The Weston Heated Fleece Jackets are available in various sizes, which include S, M, L, XL, and XXL, ensuring a comfortable fit for anyone within these sizes. You can find the size chart on the Weston Store website.
  6. Prices: Priced at $299.95 (the usual cost without the discount) for both the men’s and women’s versions, the Weston Heated Fleece Jacket positions itself as a premium winter wear option.
  7. Washability: The machine-washable design in cold water on a low cycle simplifies maintenance and ensures the jacket remains in top condition. You can wash it using a machine countless times, and the top-notch quality will remain intact. However, ensure you use the right washing procedure to avoid ruining it.
  8. Heating Zones: Strategically placed 4 heating zones (2 in front, 1 large heating zone covering the entire back, and 1 in the neck) target the body’s core areas, providing focused warmth to the back, chest, and hands.

Tips for Optimal Use: Ensuring Durability and Maximum Functionality

To ensure the longevity and optimal performance of your Weston Heated Fleece Jacket, consider using the following tips:

  • Charge the battery fully before first use.
  • Adjust the heat settings according to your individual needs and weather conditions.
  • Store the jacket in a cool, dry place when not in use.
  • Follow the care instructions carefully to maintain the jacket’s quality and extend its lifespan.

Staying Warm in Winter Hiking – The Bottom Line

In conclusion, the Weston Heated Fleece Jacket is a compelling choice for those seeking warm, comfortable, and stylish winter wear. Its innovative heating technology, soft fleece material, and practical features make it a good option for cold weather and other outdoor and indoor activities.